I needed more storage in my bedroom so I bought two basic wardrobes from Home Depot and we set out on a DIY project using minimal materials to make them beautiful! Details are below.


Materials needed:
(tap for links)
- Wardrobe– we used 2. You could also get the Ikea Pax
- molding, any style but I used something like this
- measuring tape
- mitre shears
- construction adhesive
- paintable caulk
- caulk gun
- wood filler
- bubble level or self leveling laser
- straight edge
- vintage-looking drawer pulls & knobs
- a really good primer
- paint- I used this color in the dead flat finish
Steps
This is a straight-forward process, an entry-level DIY I would say; but still it’s time consuming! With two of us working on it, it still took us the better part of a week to complete. The first step is to assemble to wardrobes. The instructions weren’t that clear and I definitely couldn’t have done it myself, so if you’re doing this solo I might suggest hiring a Task Rabbit for this part!


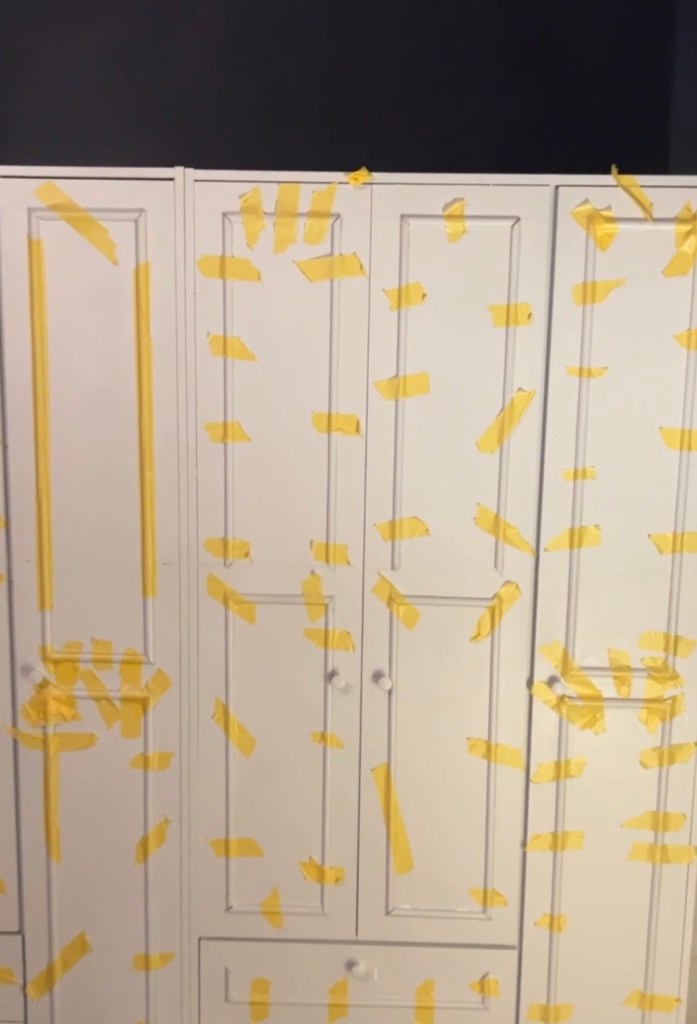
Once assembled, decide on a design for your moldings. There is no right or wrong here, it’s totally up to you! I wanted to do long & skinny boxes to mimic the design of my wainscoting. I find it helpful to map out the design with painter’s tape before committing to anything. Take measurements and mark where your molding will go with a pencil, bubble level (or laser level) and straight edge.
Next, cut your molding to size and at 45° angles on each end with the mitre shears. Buying a pair of mitre shears has been life-changing for me and is so much quicker and easier than using a mitre box & saw. If the direction of the angles is hard for you to visualize, grab picture frame you have around your house and look at the corners! After years of doing DIY, I still have to do that every time!


Attach molding to the wardrobe with construction adhesive, a little goes along way and it can get messy, so use sparingly. You can also use a nail gun and finishing nails if you prefer! Immediately place painter’s tape over each piece to hold it in place as the glue cures, at least 12 hours or overnight.
Once dry, go over each seam with caulk & wipe off excess with a damp paper towel or baby wipe. This is a very important step and will make or break this from being an obvious DIY to something people can’t believe isn’t an original part of your home! Let caulk dry completely (30 min-1 hour).
Next, it’s time to prime and paint. Priming is very important here as the material of the wardrobe is not paint-friendly, so give it a good thick coat and let dry overnight, then paint, I did two coats.

Lastly, it’s time to swap out the hardware! This is the cherry on top that just makes this wardrobe SO special. I chose these french-vintage-looking brass ones from Etsy, but you can do whatever your heart desires! We had to change the positioning of some of the knobs because of the molding & size difference, so we filled any holes with wood filler then painted over them. I then added a beautiful brass hook on the side of the wardrobe to hang my next-day clothes.


A few notes on customizations we did…
These are two wardrobes that I wanted to look like one, so we “welded” them together with a few screws and then attached a piece of molding over the seam where the two meet. Next, because I already have a closet in my bedroom, I felt I didn’t need any additional hanging space so we had wood custom cut to the inner width of the wardrobes and attached it with screw prior or putting the other shelves in.


Let me know if you have any questions. This is one of my favorite DIY’s I’ve ever done, and it’s the BIGGEST compliment when people ask me if the wardrobe is part of my apartment!
I can’t believe we took this…

…and turned it into this!

See & shop the rest of the bedroom here!

I love love your DYI of the Wardrobe!! It’s so well done it looks very expensive & classy. You should maybe consider revamping of some furniture on the side. People definitely, would want to purchase it.
It’s something to think about down the road. You have the talent why not put it to good use!